My Instagram handle is @Crafty_Mommy_Blogger. I LOVE crafting Onesies, bows, pacifier clips, and random awesomeness for my Nieces and Daughter. I’ve decided to give my lovely readers a few tutorials in a segment I’d like to call Crafty Mommy Mondays. I first saw this nice idea on Lime Lane Love! Rather than a double
digit Age, I made a single digit since my niece was turning 9 at the Time.
Here are
the Materials I Used:
- Not too thick Cardboard box (or mailing box)
- Cereal Box
- Masking tape
- Scissors
- Ruler
- Ribbons
- Pen
- Party Streamers
- Optional: Embellishments, Glue gun
(1)
Take your cardboard and pen and draw your desired number , or shape,
**It’s better to do it one side at a time due to the cardboard being too
thick to cut.
(2) Next, you cut
out the number or image you just traced. You then Use the piece you cut
out to trace the other side of the piñata.
out the number or image you just traced. You then Use the piece you cut
out to trace the other side of the piñata.
(3)
With your ruler, measure a 1 1/2 inch wide, long strip of the cereal
box and cut it out. ** Cut many pieces the same size since you won’t know how many it
will take to cover all the sides.
With your ruler, measure a 1 1/2 inch wide, long strip of the cereal
box and cut it out. ** Cut many pieces the same size since you won’t know how many it
will take to cover all the sides.
(4)
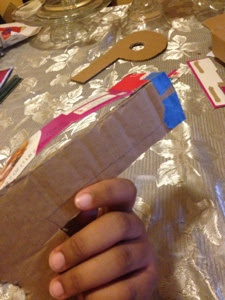
Now that you have your Strips, Desired number or shape, and tape we can
start the assembly part. Start on any part of your piñata ( I started
from the bottom since my number was a 9 and its the smallest part of the
number). Wrap your strips around the edge of the number and Tape it as
you go. If you need a longer piece, just add it at the ends of the first
strip.
** Remember to leave an Opening for the goodies to go into.
(5)
Once that step is completed you’ll need to position the other side and
tape it to the strips as well. ** I forgot to put a strip around the
middle of the 9 and remembered after I taped the 2nd side, but you have
to wrap strips around every opening so that the goodies won’t spill out.
Once that step is completed you’ll need to position the other side and
tape it to the strips as well. ** I forgot to put a strip around the
middle of the 9 and remembered after I taped the 2nd side, but you have
to wrap strips around every opening so that the goodies won’t spill out.
(6)
Decorating : Grab your party streamer and start decorating the piñata
any way you desire. I used a Gluegun to keep my piñata a little neater
(I love my Gluegun lol).
Decorating : Grab your party streamer and start decorating the piñata
any way you desire. I used a Gluegun to keep my piñata a little neater
(I love my Gluegun lol).
(7)
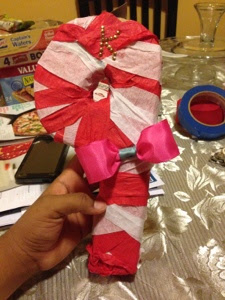
Once you finish putting on the streamers, you can embellish any way you
want. I got iron-on Studs (for 20 cents a pack at a sewing warehouse
sale!! It comes with about 500 studs!) I grabbed my Gluegun and put the
letter K in Studs on the piñata. along with a Wired Ribbon Bow.
Once you finish putting on the streamers, you can embellish any way you
want. I got iron-on Studs (for 20 cents a pack at a sewing warehouse
sale!! It comes with about 500 studs!) I grabbed my Gluegun and put the
letter K in Studs on the piñata. along with a Wired Ribbon Bow.


Nice!! I've actually always wanted to make a pinata. Very clever!
That is super cute! It was very creative the way you put it together.
How fun! My kids would love it.